I’ve imagined this tutorial as a series of posts, to share my experience in building a static website based on Jekyll. I hope this will be helpful to help you getting started in building your own website based on Jekyll.
In the first post I will cover the following content:
- Brief Summary of what is Jekyll and what are the advantages of using it
- Requirements and folder structure
- Preliminary configuration of the config.yml file
- Summary and next post
Disclaimer and requirements
This guide is based on MacOS.
What is Jekyll and what are the advantages of using it
Jekyll is a useful way to generate static websites that can then be served by webservers such as GitHub Pages.
Jekyll allow to generate beautiful websites without any prior coding knowledge. However, if someone is so inclined it is possible to extend its functionality with front-end frameworks and additional plugins to track, for instance, web views.
Requirements and folder structure
Ok, here we go!
Use the following commands to to move around folders, create a folder and generate a file:
$ cd [directory/folder]
$ mkdir [folder_name]
$ touch [file_name.ext]
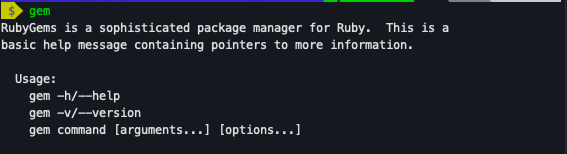
We will need Ruby gems and Git. To test wether we have them installed we can run the following commands from Terminal:
$ git
and
$ gem
If everything works as expected, you should see the following responses from Terminal:
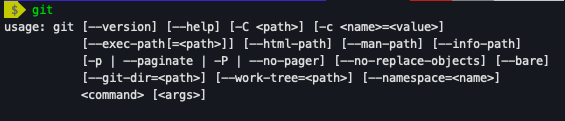 This is part of the response when git is installed
 This is part of the response when git is installed
Once everything’s in place, we can start installing the basic jekyll build. To do so, run the following:
$ gem install jekyll bundler
$ bundle install
$ jekyll new 'website_name'
For the last command, you want to change the name to the folder that will contain the files to build the website. I recommend having the following strucure:
- User/
- website_name
- website_name (this will be our working_folder)
- website_name
Once the command has finished to run, we can see how the website looks like by running the following command:
$ bundle exec jekyll serve
This will create a local environment in your browser that allow us to see the changes we make to our website! Open a page in Chrome (or your favourite browser) at the address http://localhost:4000/ to see the starting version of the website.
I know, it looks pretty bare bone and hugly but don’t worry! Will make it much more professional.
Let’s start playing around with our config.yml
For context, the config.yml file that you find in the newly created folder is a very important file and it handles the configurations of our websites. For example, the file specifies which plugins we want to have in order to add additional functionalities to our website.
I would recommend to use a text editor from now on. My preferred editor is Visual Studio Code, but you can also use Atom or any editor you like. Ok, let’s dive into our config file.
Open the file config.yml and modify the following lines:
title: "name of your website"
email: "add your personal/work email"
description: "Add the description for your website"
baseurl: "/your_website_folder"
url: "add the future url of your website"
For some context, the url can be populated with a temporary place holder, if you don’t have your url hosted yet, as we won’t need the website to be live to design it.
Now, to remove the current theme, delete the line
theme: minima
This is the default theme that comes with jekyll installation. We will use our own theme.
In the gems section add jekyll plugin autoprefixer:
- jekyll-autoprefixer
We are going to use Sass to add CSS functionalities to our website. Let’s add a section at the end of the config.yml
sass:
  sass_dir: _sass
At this point, is also useful to add some prettification for future use. Have you ever notice that professional website show structured url like https://my_website/about ? We are going to prettify our website as well by hiding the file extension on the website page.
In the section “Build settings” add the following line:
permalink: pretty
Before moving to the next step, we want to start creating some custom variables, that will be useful while building the website. We can add the following variables before the “Build settings” section:
# these variable can be accessed using the format
twitter_path: https://twitter.com/my_twitter
facebook_path: https://facebook.com/my_facebook
instagram_path: https://instagram.com/my_instagram
youtube_path: https://youtube.com/channel/my_youtube
github_path: https://github.com/my_github
These variables will allow us to easily add links to our social media pages and maintain them easily by changing only the variables if needed. The changes will be propagated.
Modify the Gemfile to reflect our config.yml modifications
Now that we modified the config.yml file extensively, we want to make sure that these modifications can work properly. We need to modify our Gemfile to match the modifications we just made.
Remove the line
gem "minima", "~> #.#"
Add the line
gem "jekyll-autoprefixer"
Save the Gemfile.
Last thing before having our balnk canvas…
If we now try to reload the website in our local host you notice that nothing has changed. This is because every time we change the config.yml, we need to restart the local service to see the changes rendered.
Before doing so, we want to delete the file in the _posts folder today's date-welcome-to-jekyll.markdown. If we don’t do that and try to restart the local host, we will get an error caused by the fact that we deleted the theme and thus, we won’t be able to render the post page generated by default.
Let’s change the index.md to index.html and add the following lines to the file:
<h1>
  My Website Title
  <h1 />
</h1>
Let’s restart the local server and Congrats! You already have your static Home that is ready to be designed!
 Congrats! This is your first website Home page!